Customize for Your Site
What You'll Learn in This Guide
After registering a camera and starting monitoring, are you seeing too many alerts — or not enough? This guide shows you how to fine-tune EVA's detection performance to match your real-world environment. Once calibrated, the AI becomes more accurate over time.
Adjusting per-object confidence thresholds (Threshold)
Refining detection scenarios for greater precision
Providing feedback to improve accuracy
Image Guided Detection (detecting new custom objects)
Detection Areas (focused zone monitoring)
Adjust Object Confidence Thresholds
Step Description
Every time EVA spots an object in the camera feed, it internally calculates a confidence score between 0 and 1. The Threshold is the cutoff for this score — only detections at or above the threshold are counted as valid. Lowering the threshold means EVA will alert even when slightly uncertain, while raising it means alerts only fire when EVA is highly confident.
- Too few detections (missed events) → Lower the sensitivity value
- If workers clearly not wearing hard hats are going undetected, lower the sensitivity so EVA sends alerts even in borderline cases
- Too many detections (false positives) → Raise the sensitivity value
- If workers who are properly wearing hard hats keep triggering alerts, raise the sensitivity so EVA only fires when it's more certain
Actions
- Open the camera monitoring page
- Select the camera you want to adjust
- Click "Detail & Settings" in the Detection targets & Areas section
- Click the button in the Detection info area of the camera monitoring screen
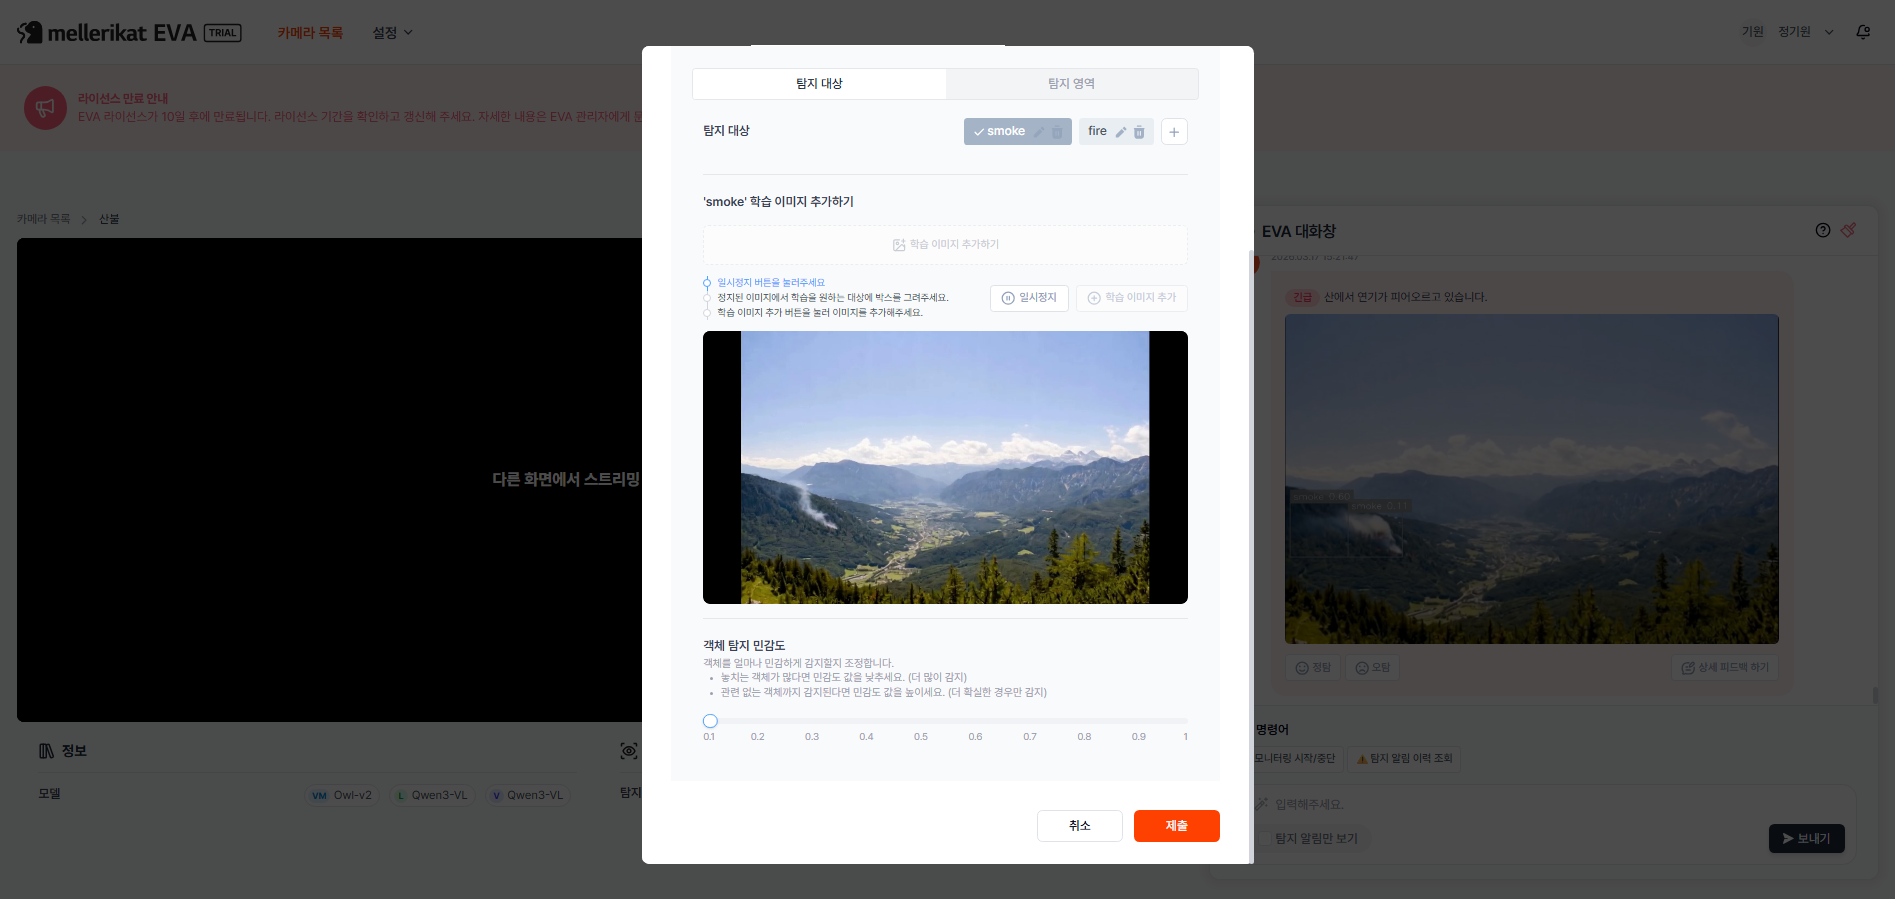
- Select the target object to adjust
- Click the object whose threshold you want to change from the detection target list
- Example: select the "person" object
- Adjust the Detection Sensitivity slider
- Slide the "Detection Sensitivity" slider at the bottom of the screen left or right
- Slide right to reduce false positives; slide left to reduce missed detections
- Save changes
- Click the "Submit" button to save your changes
Refine Detection Scenarios
Step Description
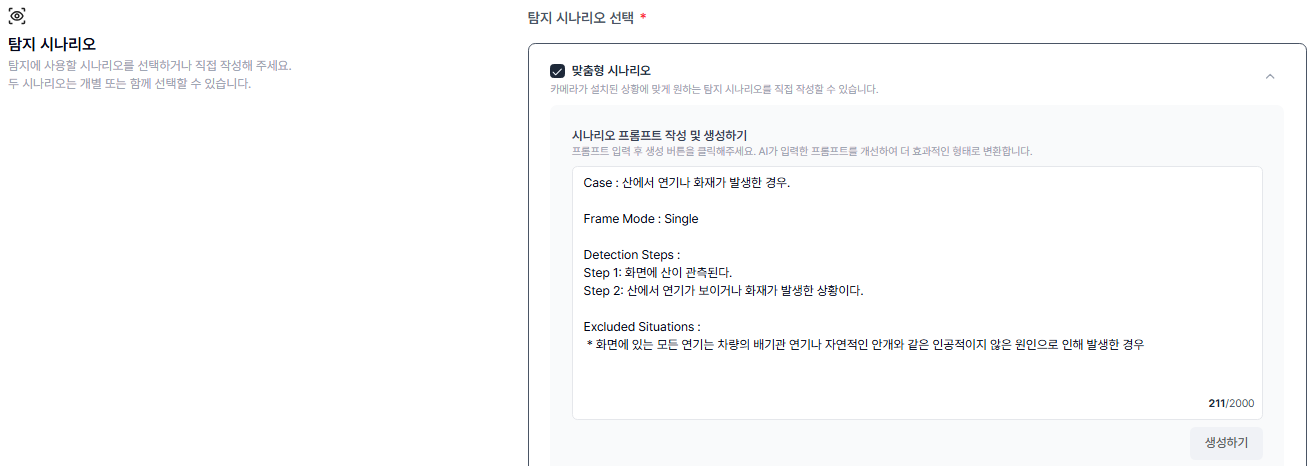
The detection scenario is the reference EVA uses to judge whether something should trigger an alert. The more specifically you write the scenario, the better EVA can distinguish real hazards from harmless situations. A detection scenario has two parts.
- Detection Steps (alert conditions)
- Describe what you want to be alerted about: "Send an alert if you see this situation"
- Example: "A worker is standing inside the work zone without a hard hat"
- Excluded Situations (exceptions)
- Describe situations that look similar but should not trigger alerts: "Even if the main condition is met, don't alert for this"
- Example: "A worker carrying a hard hat while walking through the area", "A visitor passing by outside the work zone in the distance"
When writing scenarios, concrete descriptions of specific situations work far better than vague ones. For example, if you want to detect a person who has collapsed, write "A person is lying on the floor and not moving" in Detection Steps, and explicitly list false-positive cases in Excluded Situations — such as "Exclude cases where someone is doing floor exercises or stretching in a gym or sports facility."
Actions
- Click the camera name to open the camera monitoring page
- Select the camera whose settings you want to modify
- Click the pencil icon in the top-right of the screen
- Click the pencil-shaped edit button in the top-right corner of the camera monitoring page
- Navigate to the Detection Scenario section
- In the edit screen, navigate to the "Detection Scenario" section
- Edit Detection Steps / Excluded Situations
- Review the current detection scenario
- Make the Detection Steps more precise and specific
- Add clear Excluded Situations for cases that should be ignored
- Save changes
- Click the Save button at the bottom of the page to apply your changes
Provide Feedback
Step Description
You can give feedback on EVA's alerts with a single button click — correct or incorrect. As feedback accumulates, the AI learns to filter out similar false positives on its own, and alert accuracy improves over time. Accumulated feedback data is also available as a detection reliability metric in the dashboard.
Actions
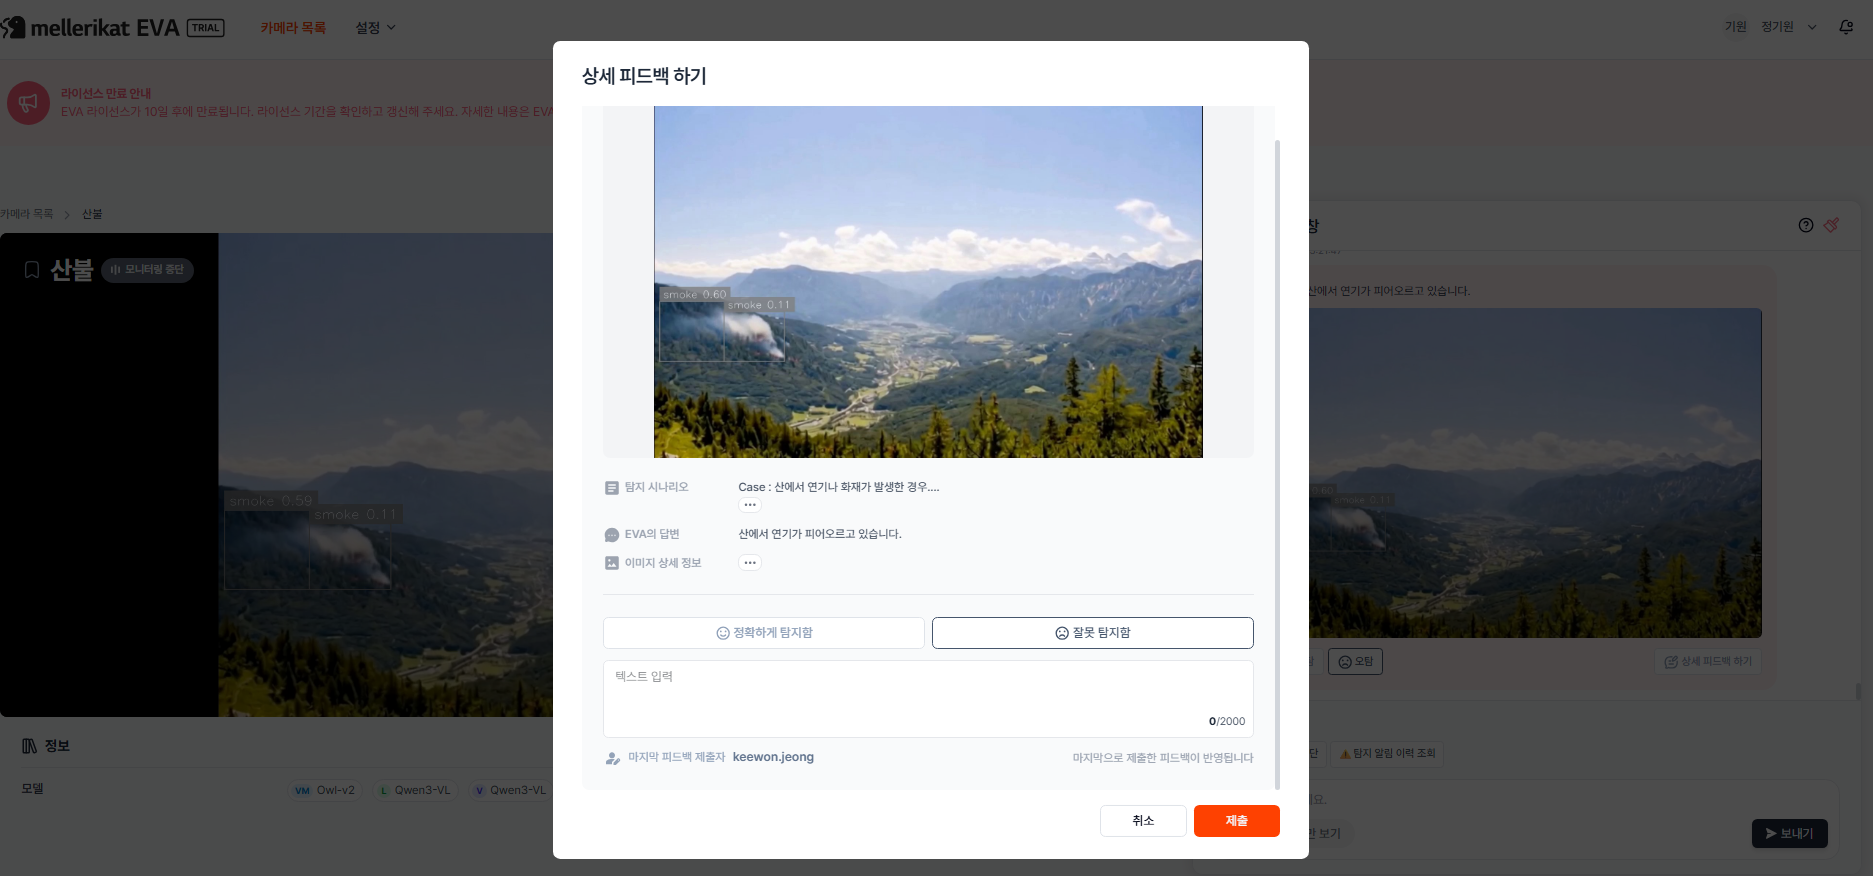
- Check detection alerts in the EVA chat
- Review detection alert messages received in the EVA chat
- Click "Correct" or "Incorrect" below the alert
- Click "Correct" if the detection was accurate, or "Incorrect" if it was a false positive
- Click "Detailed Feedback" to add more context with the image
- If you want to leave more specific feedback, click the "Detailed Feedback" button
- You can write detailed comments alongside the detection image
- Write your feedback
- Explain the specific reason for the false positive
- Example: "This person is actually wearing a hard hat — it looks like the angle caused the mistake"
- Submit the feedback
- Click the "Submit" button to send your feedback to EVA
Image Guided Detection
Step Description
Standard AI models detect commonly known objects like people, vehicles, and hard hats. But your site may have specialized objects that the AI hasn't been trained on. Image Guided Detection lets you provide just a few images of the object you want to detect — the AI memorizes its appearance and starts recognizing it in real time.
- Use this when
- You need to detect objects the AI has never seen, such as company-made safety gear or custom signs
- You want to detect when a specific product model or part produced in your factory leaves its designated location
- You want to monitor site-specific equipment (dedicated safety fences, specialized workbenches, etc.) for anomalies
Actions
- Click "Detail & Settings" on the camera monitoring screen
- Click the "Detail & Settings" button in the Detection section of the camera detail page
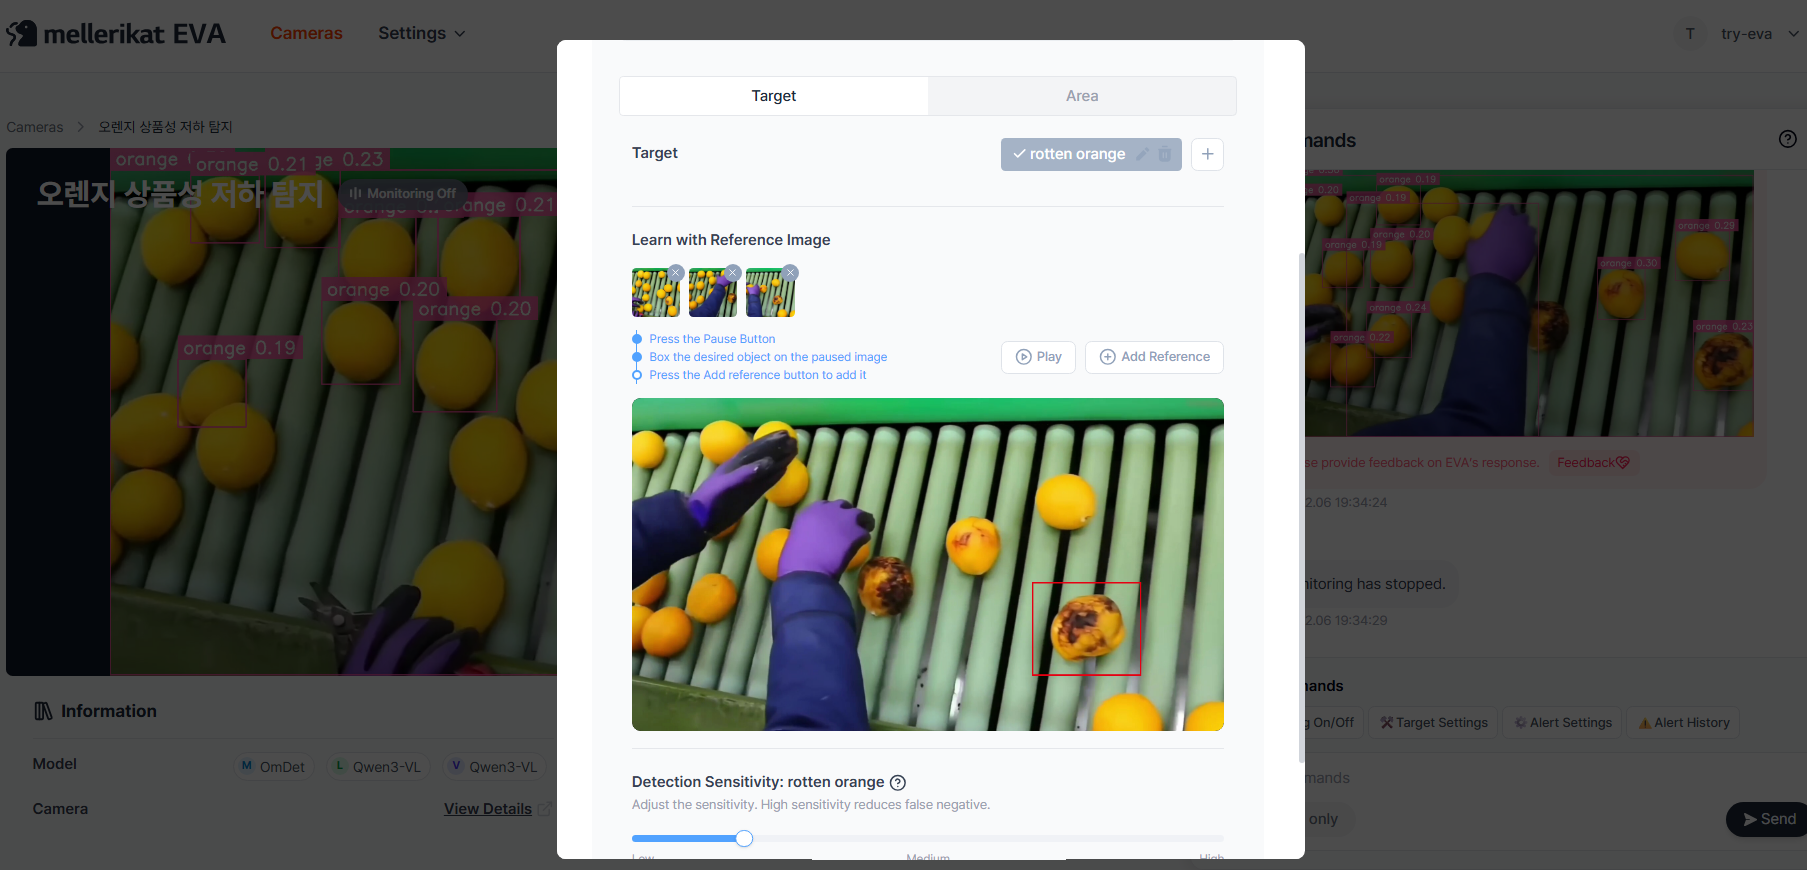
- Add a new Target
- Add a new target to apply Image Guided Detection to
- Example: "company_helmet" (company-specific hard hat)
- Pause the video when the target object is clearly visible
- In the monitoring preview at the bottom, click "Pause" when the object you want to detect is clearly visible
- Draw a bounding box around the target object
- On the paused image, draw a box that clearly encompasses the object you want to detect
- Click Add Reference
- Click the "Add Reference" button to add the selected image as a reference image
- (Optional) Add more reference images
- You can add multiple images of the object captured from different angles or under different lighting conditions
- Providing a wider variety of reference images improves detection accuracy
- (Optional) Adjust Detection Sensitivity
- Adjust the Detection Sensitivity (threshold) for this specific object as needed
- Click Submit to apply
- Click "Submit" to complete the Image Guided Detection setup
- From this point on, the camera will detect the target object based on the provided reference images
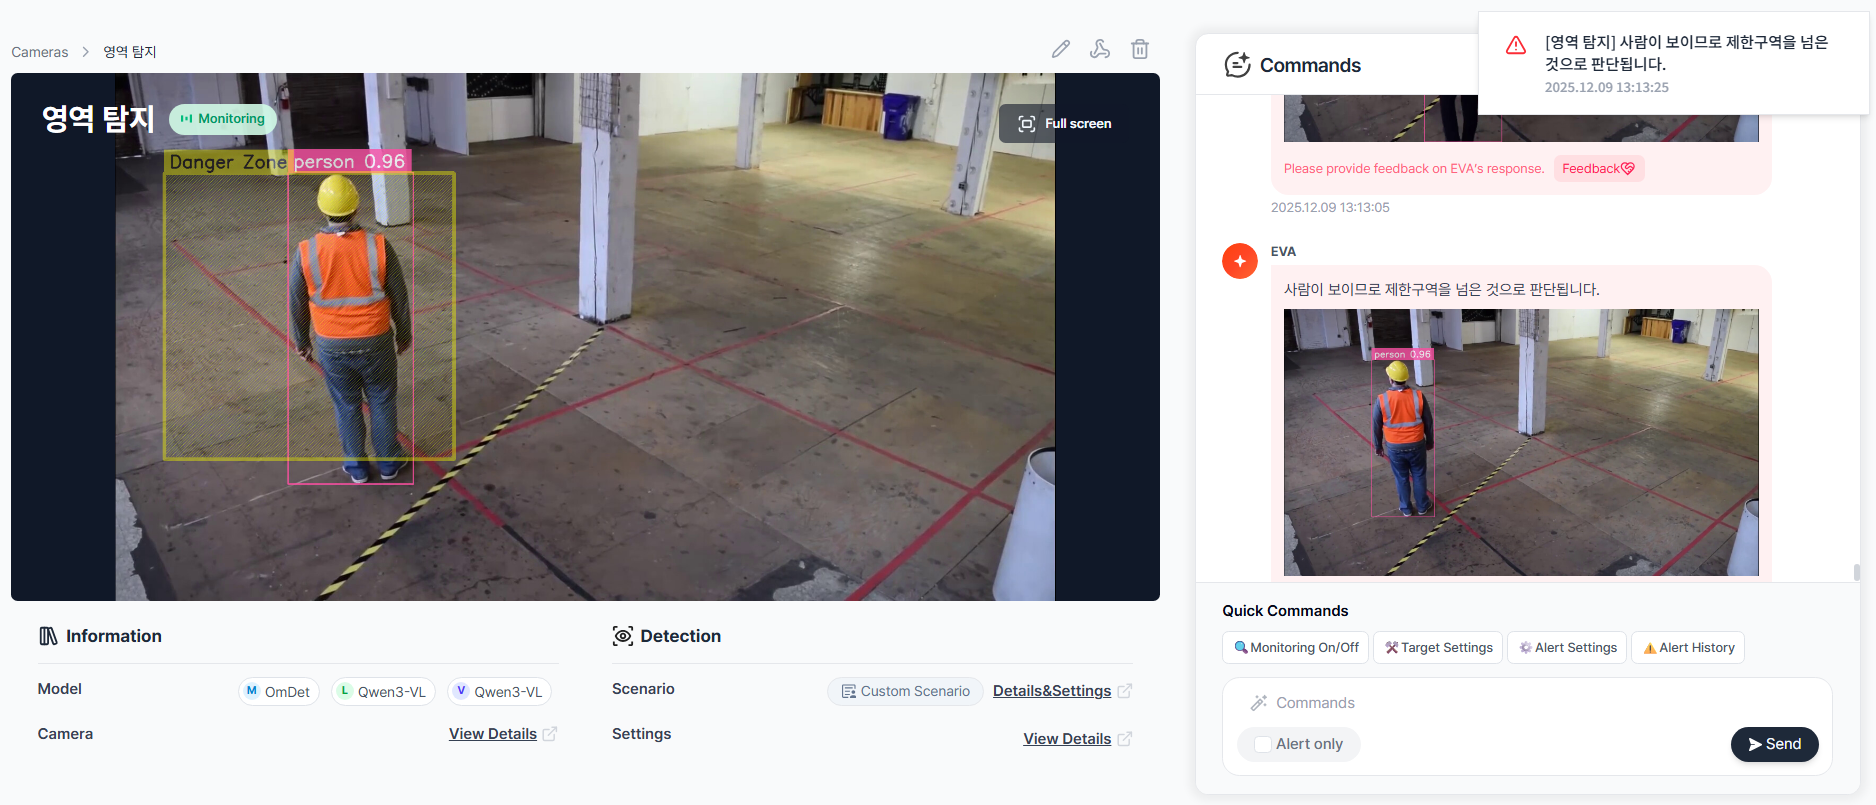
Set Detection Areas
Step Description
When a camera covers a wide area, monitoring the entire frame may generate alerts from zones you don't care about. With Detection Areas, you can select specific zones within the camera view to focus monitoring on. Alerts are only sent when a detection occurs inside the defined area, effectively reducing unnecessary false positives.
- Use this when
- You want to monitor only the machinery zone on a factory camera and exclude the walkway from monitoring
- You want to selectively monitor only fire lane or disabled parking spots on a parking lot camera
- You want to monitor entry/exit only in the secure storage area of a warehouse camera
- Movement in a corner of the frame (trees, shadows, etc.) keeps triggering false positives and you want to exclude that area
Actions
- Click "Detail & Settings" on the camera monitoring screen
- Click the "Detail & Settings" button in the Detection section of the camera detail page
- Click the Area button in the Custom Scenario tab
- Select the "Custom Scenario" tab
- Click the "Area" button to enter area configuration mode
- Name the Detection Area
- Enter a name for the zone you want to define
- Examples: "High-Risk Zone", "No-Entry Area", "No-Storage Zone"
- Use the Capture button to define the area
- Click the "Capture" button
- In the camera feed shown below, click and drag to draw a box over the area you want to designate as the Detection Area
- Click Submit to save
- Click "Submit" to complete the Detection Area configuration
- Verify on the monitoring screen
- Confirm that a yellow bounding box labeled with your area name appears on the live feed
- From now on, alerts will only be sent when a detection occurs inside that area