Quick Start Experience
What You'll Learn in This Guide
Start here when using EVA for the first time or when registering a new camera. This guide walks you through the entire core flow — from connecting a camera to setting up detection scenarios, selecting AI models, and starting real-time monitoring. Following this guide once will give you a clear understanding of how EVA works at its foundation.
How to connect a camera to EVA using an RTSP URL
How to write and generate detection scenarios in natural language
How to select the right AI model (VM, LLM, VLM) for your use case
Setting the AI inference interval
Starting real-time monitoring and checking alerts
Prerequisites Before Starting
Preparing the following items in advance will ensure a smooth experience with EVA.
Verify Your Try EVA Account
Check the account information received after your trial application (delivered via email)
Have your EVA login URL and password ready
After logging in, confirm that the Camera List page loads correctly
Prepare an RTSP URL
If using your own camera: Find your camera's RTSP URL
- Example URL format:
rtsp://username:password@ip-address:port/stream - Refer to your camera manufacturer's documentation for the exact RTSP path
- Example URL format:
If using a demo camera: You can use the cameras already provided in your Try EVA account as-is
Plan Your Detection Scenario in Advance
What do you want to monitor with the camera? (e.g., workplace safety, access control, inventory management)
In what situations do you want to receive alerts? (e.g., no hard hat detected, nighttime intrusion, specific item movement)
Access the Camera List Page
Step Description
The Camera List page is the main screen that appears right after logging into EVA, where you can manage all registered cameras at a glance. You can check each camera's detection scenario, monitoring status, and recent alert content here all at once. To register a new camera, click the "+ New Camera" button.
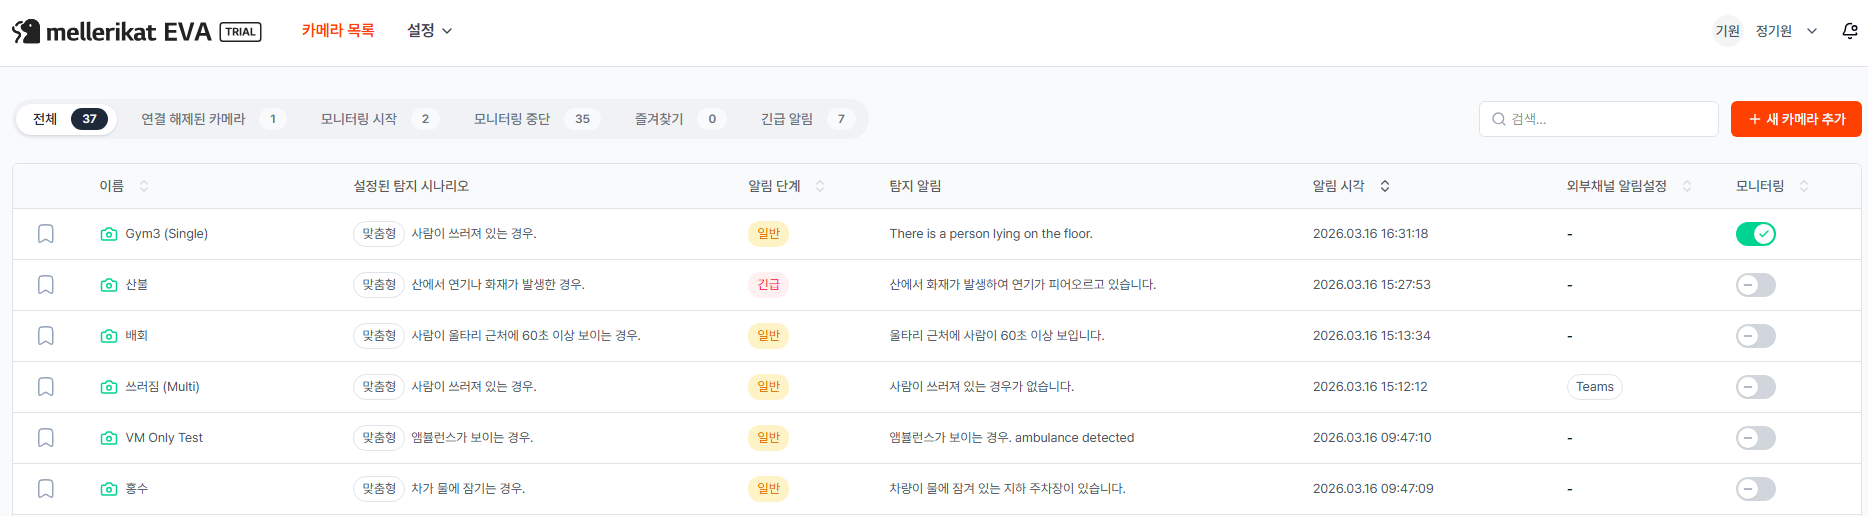
Actions
- Log in to EVA
- Go to the EVA access URL provided during trial signup
- Enter your account credentials (ID/password) received via email
- The Camera List page will appear automatically after login
- Information available on the Camera List
- The Name column displays the camera name set by the user.
- The Configured Detection Scenario column shows whether a common or custom scenario has been applied, along with the scenario content.
- The Alert Level column is divided into Normal and Emergency; the default is Normal. Emergency alerts can be configured under Settings > Emergency Alert Types.
- The Detection Alert column displays the most recent alert message generated by the VLM's analysis.
- The Alert Time column shows when the last alert was triggered.
- The External Channel Notification column displays the channel name if an external channel such as Teams has been configured to receive alerts.
- The Monitoring column features a toggle button to control monitoring On/Off for each individual camera.
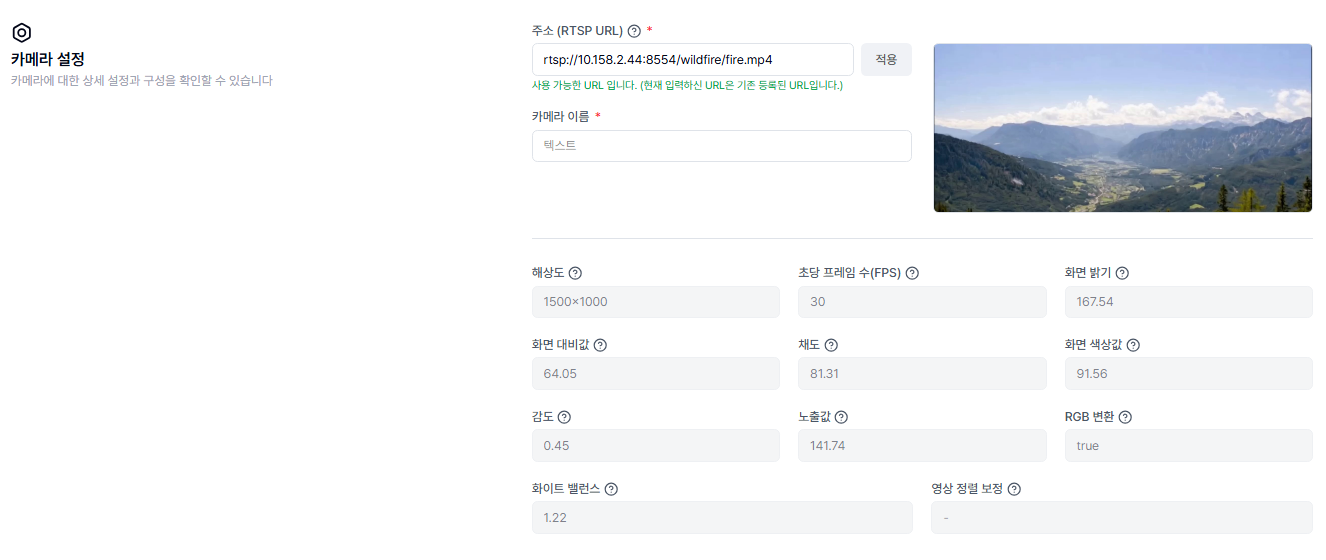
Camera Settings
Step Description
Clicking the "+ New Camera" button on the Camera List main page takes you to the camera settings page. Enter the camera's RTSP address and click Apply to automatically retrieve camera information. Once you set the camera name, the basic connection is complete.
Actions
- Enter the Source (RTSP URL)
- Paste your RTSP URL into the address input field
- URL format:
rtsp://username:password@IP-address:port/stream-path - Example:
rtsp://admin:password@192.168.1.100:554/stream
- Click Apply
- Click the "Apply" button — EVA will attempt to connect to the camera
- On success: A still image from the camera appears in the Preview area, and camera details such as resolution, frame rate, brightness, and saturation are filled in automatically
- If the URL is already registered: A message saying "The URL you entered is already registered" will appear
- On failure: Check that the RTSP URL format is correct, the camera is powered on, and the network firewall and RTSP port are open
- Set the Camera Name
- Enter a name that clearly identifies this camera
- When managing multiple cameras, it is recommended to include the location or purpose in the name (e.g., "1F Lobby Entrance", "Factory Line A")
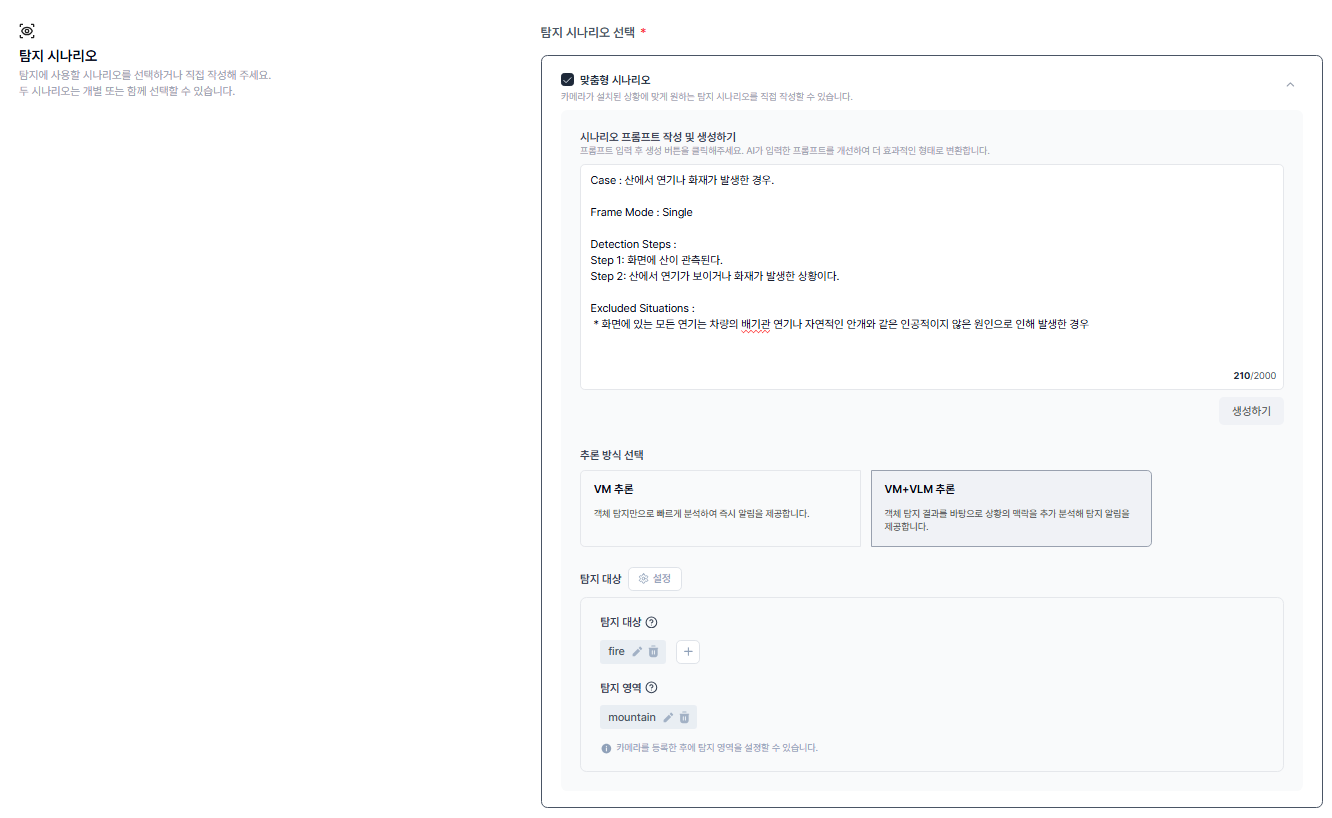
Detection Scenario Setup
Step Description
Describe in natural language what situation you want to detect, and EVA will automatically generate a structured scenario. Simply type it the way you would say it — for example, "Alert me if a worker isn't wearing a hard hat." In this step, you'll write a custom scenario that applies only to this specific camera.
Actions
- Select Scenario Type
- Custom Scenario: Write a scenario that applies only to this camera. You can freely set any detection conditions tailored to the camera's specific location and context
- Common Scenario: Use a pre-defined scenario as-is. Useful when applying the same scenario across multiple cameras at once. Common scenarios can be configured and edited under Settings > Common Scenario
- For how to set up Common Scenarios, see here.
- Write the Scenario Prompt
- Freely describe the situation you want to detect in natural language
- The more specific and clear your description, the more accurate the detection
- Examples: "Alert me if someone in the workplace is not wearing a hard hat", "Alert me if the door opens or someone approaches at night"
- Click the "Generate" Button
- Clicking "Generate" triggers the AI to analyze your prompt and automatically create a structured scenario
- The generated scenario is organized into fields such as Case, Frame Mode, Detection Steps, and Excluded Situations
- Detection targets (objects to detect) are also generated automatically
- Review and Edit the Generated Scenario
- Verify that the AI accurately reflected your intent
- If the content doesn't match, you can modify the prompt and regenerate, or directly edit the generated content
- Detection targets and areas can also be added, modified, or deleted as needed
- Select Inference Mode
- VM Inference: Analyzes using object detection only. Uses fewer resources and delivers immediate alerts — ideal for quickly detecting whether a specific object is present
- VM+VLM Inference: After object detection, the VLM performs an additional analysis of the situation before making a judgment. Uses more resources, but is well-suited for complex environments or detection scenarios where context matters
- Use VM Inference for simple object presence detection, and VM+VLM Inference when behavior or situational judgment is required
AI Model Selection
Step Description
EVA operates with three types of AI models working together in distinct roles. The VM detects objects in the camera feed, the VLM makes the final judgment on whether the situation matches the detection scenario, and the LLM handles chat interactions with the user and scenario comprehension. Start with the default model combination, then adjust based on detection results as needed.
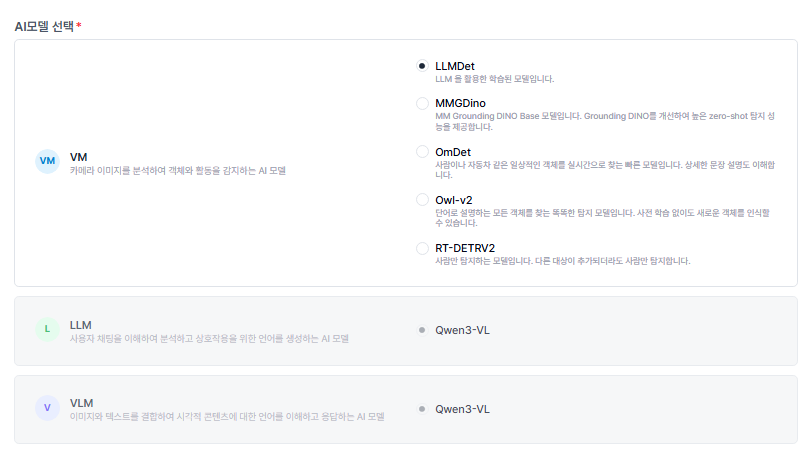
Actions
- Select a VM (Vision Model)
- Responsible for detecting objects in real time from the camera feed. Choose one of the five models based on your environment
- LLMDet: Allows flexible natural-language descriptions of detection targets — useful for detecting unusual or complex-shaped objects
- MMGDino: Detects a wide variety of objects with high accuracy. Well-suited for complex environments with mixed objects like safety gear and tools
- OmDet: Quickly detects common objects such as people, vehicles, and hard hats. A solid default choice for most environments
- Owl-v2: Can detect objects described by name without prior training. Particularly effective for detecting specialized equipment or parts when used with Image Guided Detection
- RT-DETRV2: A model specialized in detecting people. Best suited for scenarios that only require detecting humans, such as intrusion detection, access control, or headcount monitoring
- Select an LLM Model
- A language AI that understands chat commands entered by the user and the text of detection scenarios
- Currently available model: Qwen3-VL
- Select a VLM Model
- An AI that compares the objects and context detected by the VM against the detection scenario and makes the final decision on whether to send an alert. Activated when using the VM+VLM inference mode
- Currently available model: Qwen3-VL
AI Inference Interval
Step Description
Set how frequently EVA analyzes the camera feed. For example, setting it to 30 seconds means EVA analyzes a frame every 30 seconds and determines whether a detection event has occurred. A shorter interval brings detection closer to real time but consumes more system resources.

Actions
- Enter the Inference Interval
- Enter the time interval in seconds at which the AI should analyze the camera feed and perform detection
- The default is 120 seconds. Start with the default and adjust as needed while monitoring
- Longer interval (e.g., 120s): Conserves resources — suitable for scenarios where checking status matters more than tracking rapid changes
- Shorter interval (e.g., 10s): Tracks changes in near real-time or enables immediate response in urgent scenarios. Note that very short intervals may lead to excessive resource usage
Save & Start Monitoring
Step Description
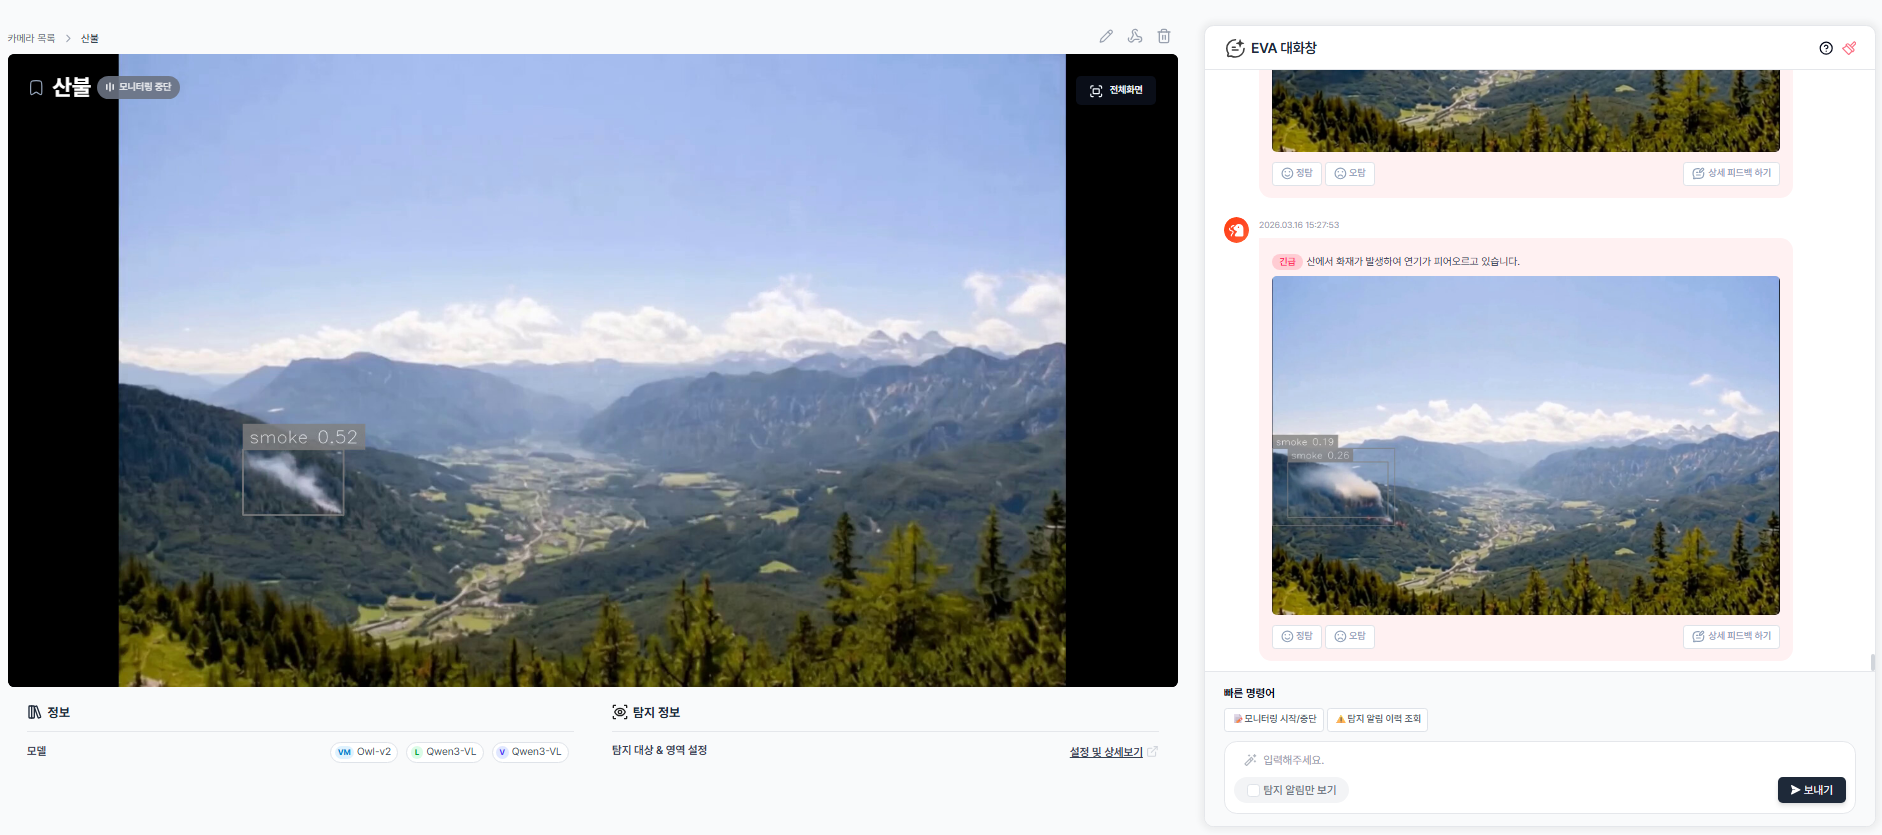
Once all settings are complete, click Save to register the camera in EVA. After saving, you'll be redirected to the Camera List. Click the registered camera name to open the detail page and start monitoring right away. When monitoring is on, EVA analyzes the feed at the configured inference interval and sends alerts to the EVA chat whenever the detection scenario conditions are met. Each alert includes a detection image and an AI-generated description of the situation, so you can immediately understand what happened on-site.
Actions
- Click the Save Button
- Click the "Save" button at the bottom of the page
- Once saved, you are automatically redirected to the Camera List page
- Open the Camera Detail Page
- Click the name of the camera you just registered in the Camera List
- You will be taken to the camera detail page
- Start Monitoring
- You can start monitoring using any of the following three methods
- Click "Start Monitoring" in Quick Commands
- Type "start monitoring" in the EVA chat
- Click the toggle button on the right side of the camera row in the Camera List page
- Confirm that the monitoring indicator appears in the top-left of the screen
- View Real-Time Detection Results
- Object detection results are displayed in real time on the left side of the screen
- Each detected object shows a confidence score (0.0–1.0), which can be referenced when adjusting Threshold values later. For Threshold adjustment, see here.
- Check Alerts
- When a situation matching your scenario occurs, an alert appears in the EVA chat
- Each alert includes the detection time, a detection image, and a VLM-generated description of the situation
- If a Webhook is configured, alerts are also sent simultaneously to external channels such as Teams. For more details, see here.
- Stop Monitoring
- Click "Stop Monitoring" in Quick Commands, or type "stop monitoring" in the chat
- You can also toggle monitoring On/Off at any time using the toggle button in the Camera List